
Nexus_Part_1
- sivaprasad.spch@gmail.com
- January 6, 2026
- No Comments
Table Of Contents
1. What is Nexus?
2. Why Do We Use Nexus?
• 2.1. Central Storage for All Builds
• 2.2. Stores Docker Images Too
• 2.3. Manages SNAPSHOT and RELEASE Versions
• 2.4. Jenkins & CI/CD Integration
• 2.5. Safe Custom Dependency Storage
• 2.6. Backup and Restore
3. Nexus Installation on Red Hat–based EC2 Instance
• 3.1. Prerequisites
• 3.2. Hardware Requirements
4. Nexus 3.x Installation Steps
• 4.1. Step 1: Launch EC2 Instance
• 4.2. Step 2: Connect to Instance
• 4.3. Security Best Practice
• 4.4. Step 15: switch to nexus user
• 4.5. Step 16: Start Nexus Service
• 4.6. Step 17: Enable Port and Access Nexus Web UI
• 4.7. Step 18: Login to Nexus
• 4.8. Setup Finished
• 4.9. How to Change Nexus Port Number & Context Path
1. What is Nexus?
Nexus Repository Manager is a powerful artifact repository tool used to manage, store, and retrieve software components (artifacts) in a centralized and secure manner.
It acts as a central hub for storing:
• .jar files (Java libraries)
• .war files (Web apps)
• .ear files (Enterprise Java apps)
• .zip files (packaged content)
• Docker images
• Helm charts, NPM packages, and more…
It’s like a warehouse for all your build outputs and project files.
Nexus is open-source, developed in Java, and is platform-independent, making it highly compatible with modern DevOps tools like Jenkins, Maven, and Docker.
2. Why Do We Use Nexus?
1. Central Storage for All Builds
• After building a project using Maven, the .jar or .war files are stored safely in Nexus.
• This eliminates the need to search folders, as everything is centralized.
2. Stores Docker Images Too
• Nexus functions as a Docker Registry, allowing secure storage and retrieval of Docker images.
• Useful for private Docker images within a company.
3. Manages SNAPSHOT and RELEASE Versions
• In Maven projects:
1.0.SANPSHOT= development version
1.0 = final release
• Nexus clearly separates development and production builds.
4. Jenkins & CI/CD Integration
• Jenkins can push .jar or .war files directly to Nexus after building.
• Nexus integrates into the pipeline, removing the need for manual uploads.
5. Safe Custom Dependency Storage
• Custom .jar files not in public repositories can be uploaded to Nexus.
• These can be used in Maven by referencing the Nexus URL.
6. Backup and Restore
• Nexus data can be backed up to remote storage.
• In case of system failure, jar, war, or Docker images can be restored from backup.
3. Nexus Installation on Red Hat–based EC2 Instance
Prerequisites
• Nexus Repository Manager 3.x requires Java 1.8 / Java 8.
• It’s a cross-platform application, but must be run with Java.
• Nexus is not a traditional installer; it’s shipped as a compressed archive.
• After extraction, two main directories are created:
• nexus3.x — the application
• sonatype-work— stores repository data (common across versions)
Hardware Requirements
• Minimum 2 GB RAM for Nexus and 1 GB for system operations.
• Recommended EC2 instance type: t2.medium or higher.
Nexus 3.x Installation Steps
Step 1: Launch EC2 Instance
• Type: t2.medium
• OS: RHEL, CentOS, Rocky Linux, or similar
Step 2: Connect to Instance
ssh -i
Step3: Install java
sudo rpm –import https://yum.corretto.aws/corretto.key
sudo curl -Lo /etc/yum.repos.d/corretto.repo https://yum.corretto.aws/corretto.repo
sudo yum install -y java-1.8.0-amazon-corretto-devel –nogpgcheck –> java -version
Step 4: Install basic utilities
“yum install tar wget tree -y “
• tar: To extract tar files
• wget: To download the Nexus archive
• tree: (Optional) To view directory structure
Step 5 : wget https://download.sonatype.com/nexus/3/nexus-3.70.1-02-java8-unix.tar.gz
tar -zxvf nexus-3.70.1-02-java8-unix.tar.gz
mv nexus-3.70.1-02 nexus
**Security best practice **
A. Create nexus user
useradd nexus
Give sudo access to nexus user
visudo –> nexus ALL=(ALL) NOPASSWD: ALL

This allow the nexus user to run commands as root if needed.
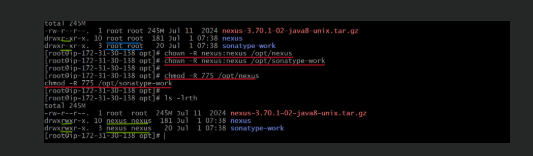
Step 6 : Change ownership for directories
chown -R nexus:nexus /opt/nexus
chown -R nexus:nexus /opt/sonatype-work
chmod -R 775 /opt/nexus
chmod -R 775 /opt/sonatype-work
these steps ensure that only nexus user has access to the nexus files.
Step 7: Set run user in nexus.rc
vi /opt/nexus/bin/nexus.rc –> inside this file, you’ll see this line (commented by default):
# run_as_user=”” —-> run_as_user=”nexus” –> this ensures nexus runs as the nexus user when started as a service.
Step 8: Created systemd service for nexus
vi /etc/systemd/system/nexus.service –> and then paste the following the content —>
[Unit]
Description=nexus service
After=network.target
[Service]
Type=forking
LimitNOFILE=65536
ExecStart=/opt/nexus/bin/nexus start
ExecStop=/opt/nexus/bin/nexus stop
User=nexus
Restart=on-abort
[Install]
WantedBy=multi-user.target
above content creates a proper service to start/stop nexus easily using systemctl.
Step 9: Switch to the nexus user
sudo su – nexus –> start nexus service by using below commands
sudo systemctl start nexus
sudo systemctl status nexus
enable the port in aws console and access the nexus from web UI.
Step 10 : Login to nexus
A. Click on the sigh in button at the top right.
B. First time login password in –> cat /opt/sonatype-work/nexus3/admin.password

#. would you like to allow anonymous access?
You can choose:
Yes –> Anyone can browse public repositories.
No –> Only logged in users can nexus.
Its recommended to disable anonymous access unless you’re using a public mirror or open source repo.
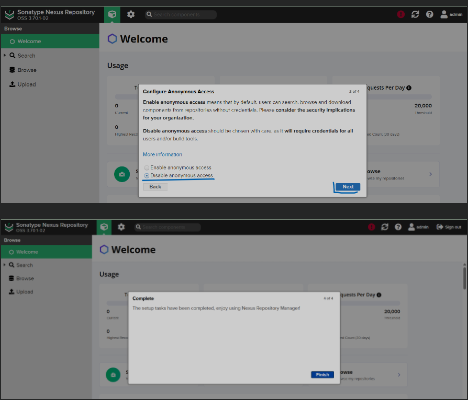
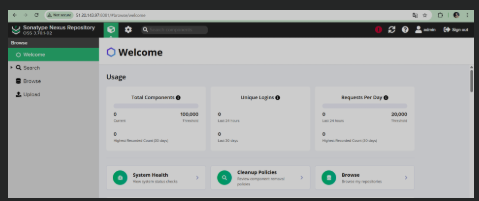
Setup Finished:
After that, you’ll land on the nexus dashboard,where you can
. create repositories(Maven.Docker, etc…)
. Manage users.
. Monitor artifacts.
How to change nexus port number & Context path
By default, nexus runs on port 8081, you can change it as follows:
A. step 1: Navigate to the nexus config directory.
cd /opt/nexus/etc/
B. step 2 : Edit the nexus-default.properties file
vi nexus-default.properties
look for this line –> application-port=8081 –> change it to your desired port –> application-port=8888
C. step 3: Restart the nexus service to apply changes
sudo systemctl restart nexus
Note: Don’t forget to enable the new port in your aws security group to allow external access.
.Now you can see nexus running with the new port.