

Apache_TomCat
- sivaprasad.spch@gmail.com
- January 6, 2026
- No Comments
🌐 What is Apache Tomcat ?
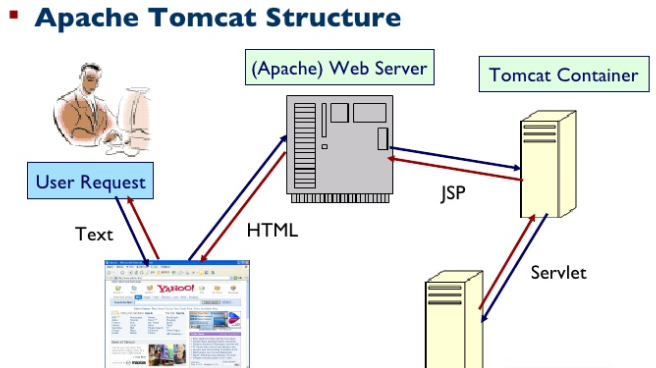
Apache Tomcat, developed by the Apache Software Foundation, is an open-source implementation of the Java Servlet, JSP (JavaServer Pages), and WebSocket specifications. It provides a pure Java HTTP web server environment where Java code can run.
Core Components:
• Catalina: The servlet container that manages the lifecycle of servlets (init, service, destroy).
• Coyote: The connector that handles HTTP communication between clients and the server.
• Jasper: The JSP engine that compiles JSPs into servlets.
⚙️ What Does Tomcat Actually Do?
Tomcat’s main job is to deploy and run Java web applications packaged as .war files. Here’s what it does behind the scenes:
• Receives HTTP requests from clients (via Coyote).
• Processes requests using servlets (via Catalina).
• Generates dynamic responses using JSPs (via Jasper).
• Manages sessions, security, and configuration for web applications.
Unlike full Java EE servers, Tomcat does not provide enterprise features like EJB (Enterprise JavaBeans), JMS (Java Messaging Service), or advanced transaction management. It focuses purely on the web tier.
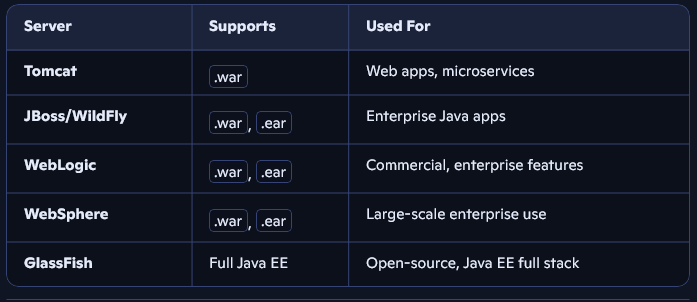
3. Types of Java Application Servers
In Java development, various application servers are used depending on the type and complexity of the application.
💡 Why Choose Tomcat?
Tomcat is often the default choice for developers building modern Java web applications. Here’s why:
• Lightweight & Fast: Minimal overhead compared to full Java EE servers.
• Open Source & Free: Backed by Apache, widely supported by the community.
• Easy to Use: Simple configuration and deployment process.
• Industry Standard: Commonly used for frameworks like Spring Boot and microservices.
• Scalable: Works well for small apps and can scale to handle large traffic with proper tuning.
• Developer-Friendly: Great for learning, prototyping, and production-ready deployments.
🚀 Installing Apache Tomcat on EC2 Linux
Apache Tomcat is one of the most popular servlet containers for running Java web applications. In this guide, we’ll walk through the installation process on an Amazon EC2 Linux instance, step by step.
✅ Prerequisites:
Before starting, make sure you have:
• Java 1.8 or above (Tomcat 9.x requires at least Java 8; Java 21 works too).
• 1 GB RAM (sufficient for small web applications).
• Linux server (Amazon EC2 is a common choice).
🖥️ Step-by-Step Installation:
Step 1: Launch EC2 Instance
• Create an EC2 machine (Amazon Linux or CentOS recommended).
• Connect to it via SSH.
Step 2: Connect to the Server –> ssh -i your-key.pem ec2-user@
Step 3: Switch to Root User –> sudo su –
Step 4: Install Java
Search for available Java versions –> sudo yum search java | grep OpenJDK,java -version,sudo yum install java-21-openjdk-devel -y
Step 5: Install Required Utilities –>yum install wget unzip tree -y
Step 6: Download Tomcat
Navigate to /opt/ directory –>cd /opt/
wget https://dlcdn.apache.org/tomcat/tomcat-9/v9.0.109/bin/apache-tomcat-9.0.109.zip(use ooficial website for latest links)
Step 7: Extract Tomcat –>unzip apache-tomcat-9.0.109.zip
Step 8: Navigate to bin/ Directory –> cd /opt/apache-tomcat-9.0.109/bin
Step 9: Make Scripts Executable –> chmod u+x *.sh (This ensures startup and shutdown scripts can be executed)
A. ./startup.sh
B. ./shutdown.sh
Note : If you want to start/stop tomcat server from anywhere instead of bin dir?
ln -s /opt/apache-tomcat-9.0.109/bin/startup.sh /usr/bin/startTomcat
ln -s /opt/apache-tomcat-9.0.109/bin/shutdown.sh /usr/bin/stopTomcat
Now you can go and run in any directory.
Access Tomcat in your browser at –> http://
🧭 Conclusion
With these steps, you’ve successfully installed Apache Tomcat on an EC2 Linux instance. From here, you can deploy your .WAR files into the WEBAPPS/ directory and start serving Java web applications.
Accessing Tomcat Manager & Host Manager:
Even after enabling port 8080, you may find that Server Status, Manager App, and Host Manager are not accessible. This is because Tomcat restricts access by default. You need to configure it.
🔹 Manager App Configuration
1. Navigate to the manager app directory –> cd /opt/apache-tomcat-9.0.109/webapps/manager/META-INF –> vi context.xml –> Comment out the 21st and 22nd lines (which restrict access) –>Refresh the Tomcat main page → it will now ask for credentials –> Add users in tomcat-users.xml (cd /opt/apache-tomcat-9.0.109/conf/
vi tomcat-users.xml –>
Host Manager Configuration:
Follow the same process for Host Manager:
1. Navigate to host-manager directory –>cd /opt/apache-tomcat-9.0.109/webapps/host-manager/META-INF –> Edit and comment out the restricted lines –> Refresh the page → enter the credentials you added in tomcat-users.xml
Verify Logs:
Finally, check the logs to confirm everything is working
cd /opt/apache-tomcat-9.0.109/logs
Here you’ll find files like:
catalina.log
localhost.log
manager.log
host-manager.log
🎯 Conclusion
By enabling port 8080 in your EC2 security group and configuring Tomcat Manager/Host Manager, you can securely access and manage your Tomcat server from your PC. This setup allows you to deploy applications, monitor server status, and manage hosts directly through the Tomcat web interface.
🔄 How to Change Tomcat Port Number (and Why It’s Needed)
When running multiple applications on the same server, port conflicts are a common issue. By default, Apache Tomcat runs on port 8080. But what if another application—like Jenkins—also uses port 8080? You’ll run into a conflict and see errors such as ” java.net.BindException: Address already in use ” To resolve this, you need to change the port number for one of the applications.
⚠️ Why Change the Port Number?
• Tomcat default port: 8080
• Jenkins default port: 8080
• Running both on the same server → port conflict.
• Solution: Assign a different port (e.g., Tomcat on 8081, Jenkins stays on 8080).
🛠️ Steps to Change Tomcat Port Number
Step 1: Go to the Configuration Directory –> cd /opt/apache-tomcat-9.0.109/conf
Step 2: Edit server.xml –> vi server.xml –> Locate the Connector element (around line 71) –>
connectionTimeout=”20000″
redirectPort=”8443″ />
Change the port number (example: 8081) –>
connectionTimeout=”20000″
redirectPort=”8443″ />
Restart Tomcat :
./shutdown.sh
./startup.sh
Access with New Port –> http://:8081
🎯 Conclusion:
Changing Tomcat’s port number is essential when running multiple services like Tomcat and Jenkins on the same server. By editing , you can easily avoid conflicts and keep both applications running smoothly.