

Nexus_Part_2
- sivaprasad.spch@gmail.com
- January 7, 2026
- No Comments
Table Of Content
Introduction
Snapshot vs Release in Nexus
2.1 Snapshot
2.2 ReleaseSteps to Create Repositories in Nexus
3.1 Snapshot-repo
3.2 Release-repoNexus Repository URLs
Integrate Nexus with Maven
5.1 Step 1: Add Nexus URLs inpom.xml
5.2 Step 2: Configure Credentials in MavenDeploying Artifacts to Nexus
6.1 Now Run AgainWhy Is It Always Uploading to the Snapshot Repository?
7.1 Now Run Again Without Changing Version
7.2 Now Change the Version and Deploy AgainRedeploying Release Artifacts
8.1 Problem: 400 Bad Request – Artifact already exists
8.2 Solution: Enable “Allow Redeploy”
Introduction
In real-time projects, efficient artifact management is a crucial part of the CI/CD pipeline. Tools like Nexus Repository Manager help teams host and distribute Java artifacts (JAR, WAR, etc.) using Maven repositories.
This blog explains:
• How to create Nexus repositories (snapshot & release)
• How to integrate Nexus with Maven
• How snapshot and release versions work in real-time
• How to redeploy artifacts in special cases.
- Snapshot vs Release:
In Nexus Repository, snapshots are used during development. They represent work-in-progress builds and are marked with the suffix –SNAPSHOT (for example, 1.0-SNAPSHOT ). A snapshot can be redeployed multiple times with the same version number, and Nexus internally adds timestamps to distinguish different builds. This makes snapshots flexible for frequent updates while a project is still evolving.
On the other hand, releases are finalized, stable builds intended for production. Once a release version (like 1.0.0) is deployed, it cannot be changed or overwritten. This immutability ensures consistency, reproducibility, and reliability when teams depend on a specific version in production environments.
2. Steps to create Repositories in Nexus.
You’ll generally create two types of maven hosted repositories per project.
- Snapshot-repo –> used to store developement builds.
Steps:
*. Login to nexus as admin –> Navigate to settings –> repositories –> click on create repository –> select maven2(hosted) –> ecommerce-snapshot-repo –> set version policy snapshot (leave others have defualt) –> scroll down and click create repository. –> Now you see your repository created.
2. Release-Repo: used to store production-ready builds.
Steps:
Again, go to create repository –> Maven2(hosted). –> Name ecomerce-release-repo –>version policy (release) –> click create –> now you can see the release repository is also created.
3. Nexus repository URL’s :
Once you create your repositories nexus automatically generates a unique URL’s for each repo.
How to copy Repository URL’s ?
A. Go to settings –> repositories –> you will see a list of your created repo’s, here beside each repo you’ll find a copy URL button.
B. Each repository has its own unique url. Use these url’s in your POM.XML
Integrated Nexus with Maven:
Step1: Add nexus url’s in pom.xml.
. Update the distributionMangement block.
. One is for release. And another one is for snapshot.
. You need to copy the release repository URL and paste it inside the < repository> section.
. You need to copy the snapshot repository URL and paste it inside the
Step2: Configure Nexus Credentials In Maven
. You need to give nexus cred’s in Maven’s settings.xml file.
. Edit the Maven settings.xml file (usually at /opt/apchae-maven-x.x.x.x/conf/settings.xml).
. Find the
. Go to the end of
.Paste the code below with your username and password.
. This avoids keeping credentials in the pom.xml.
Step 3. Deploying Artifacts To Nexus
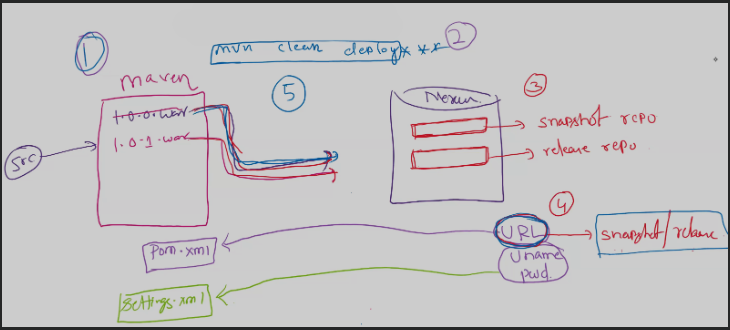
Now you can go the project path and run the Nexus goal. To deploy your artifact to the Nexus repository.
mvn clean deploy
. Then the .war file will be uploaded to the Snapshot Repo
. You can go to Nexus –> ecomerce-snapshot repo and see the uploaded artifact.
Now run again –> mvn clean deploy –> again it uploads a new build to the same ecomerce-snapshot repo, but with different timestamp.
. Because snapshot=development version, so Nexus allow mutilple uploads with timestamps like
maven-web-app-1.0.0-20250702.075001-1.war
maven-web-app-1.0.0-20250702.075502-2.war
Step 4: Why it’s always uploading to the snapshot repository ?
If your pom.xml has this
–> the maven automatically pushes it to the snapshot repo –> if you want push release repo, remove -SNAPSHOT
. Now you run
mvn clean deploy
. it will go the release repository.
. Go to the Nexus ecomerce-release repo, and you will see the .war file uploaded there.
Step5: Now run again without changing version.
.Try to run mvn clean deploy again without changing version ?
. You will get an error like : failed to deploy artifacts:status code 400 repository does not allow redeployments.
. Because release repository doesn’t allow duplicates uploads for same version by defult.
. Now change the version and deploy again
run mvn clean deploy
Step 6: Redeploying Release artifacts ?
In real time releasing with the same version again is not allowed by default.
Problem: 400 bad request – artifact already exits. Solution: Enable “Allow Redeploy ” for this go to nexus UI, navigate to settings, then repositories, and select the release repo and scroll to hosted settings and enable the allow redeploy and save. Now go to your project and ru the build again.
mvn clean deploy –> this time buils success –> now mvn clean deploy overwritten the existing artifact.
Note: After successdul deployment, go back and disable “Allow Redeploy” ahain